
Texture with Layer Modes

Stencil Design
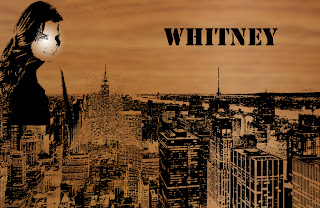 First you find a picture of something and add it to photoshop, and then you change the threshold to show as many details as possible. Then you add a picture of wood and a picture of a girl to photoshop bridge. You choose the move tool to move the wood to the city picture and you invert the colors. Then you change the threshold for the picture of the girl as well to show as many details. You select the move tool and place it with the city picture. You select the brush tool to erase the black spots. The you go to your gradient tool pick the radial gradient tool and pick a transparent one click shift and draw a diagonal like from the girls eye to her jaw to illuminate her face. The use the text option to add your name at the top.

Jack O' Lantern


The difference between a Smart filter and a normal filter is that Smart Filters offer adjustments without compromising any pixel data. We can add multiple filters one on top of one another, change the order of the Smart Filters to change the resulting effect. We can remove or hide Smart Filters at any time or we can continuously edit the settings of the Smart Filters to achieve different interesting effects. Also we can paint in a mask to hide or reveal different areas of the filter for refined edits, all without altering the image data.

Quick Mask is not a tool as such, but a mode you can enter when working with selections. The Quick Mask lets you create a ready-made mask,which you can edit or turn into a selection by painting with black or white colors. Using this masking technique, you are actually masking the areas you paint, so you must inverse the selection before making any adjustments.
 In this easy to follow tutorial we are going to add a soft-focus effect to a portrait that not only minimizes skin imperfections but also adds a romantic glow to the subject’s skin and still keeps the subject’s main features in focus. This technique is a must now for everyone who wants to work in the photo retouching department.
Adobe Illustrator Flash Drive
 For this assignment I used a new program called Adobe Illustrator. In this program I learned how to create a series of rectangles and elipses and how to align them, as well as to send a shape to the back. I also used elements I learned in Photoshop to change the gradient of each shape, and to add text to it as well.
House Phone
 For this assignment I used Adobe Illustrator and I also used the ellipse tool, the rectangle tool, gradient, stroke and object>path>offset path. For the buttons I used the line tool, and I used text for the numbers.

For this project I used the pen tool to create the vectors into shapes to make the face features. Then I used the blending options like inner glow, outer glow, gradient overlay, and stroke on each shape to make it seem like there's light inside of the pumpkin. The I used the round soft brush in a light orange to show the light showing through the shapes. Then, I used a darkher orange closer to teh edge of the pumpkin to help the light orange pop out more.
Flag Displacement

For this project I used a Dominican Flag and Flag Displacement. I found a picture of a brick wall and a flag, put the brick wall down first then the Dominican flag, then because of the flag displacement it looked more realistic.
Face Displacement

For this project I used the same directions as for the flag except I used my face instead of the brick wall, and used the magnectic lasso to take my eyes, teeth, lips, and nostrils out.
Motion Blurred via Smart Filter

The difference between a Smart filter and a normal filter is that Smart Filters offer adjustments without compromising any pixel data. We can add multiple filters one on top of one another, change the order of the Smart Filters to change the resulting effect. We can remove or hide Smart Filters at any time or we can continuously edit the settings of the Smart Filters to achieve different interesting effects. Also we can paint in a mask to hide or reveal different areas of the filter for refined edits, all without altering the image data.
Masking An Area For a Desired Effect

Quick Mask is not a tool as such, but a mode you can enter when working with selections. The Quick Mask lets you create a ready-made mask,which you can edit or turn into a selection by painting with black or white colors. Using this masking technique, you are actually masking the areas you paint, so you must inverse the selection before making any adjustments.
Soft Filtering Skin Tone

Adobe Illustrator Flash Drive

House Phone

No comments:
Post a Comment