Monday, December 2, 2013

3rd Marking Period

 
Assignment #21


My first experience with this Sketch program was interesting. Drawing the basic shapes was easy and so was changing the view as well as the push and pull, but drawing my name was hard and it looks ugly.
 
 Assignment #22
Isometric Block #1

 
Doing this block was easy since I've already drawn these shapes in Art and Design Freshman year. However, the measuring tape tool and then drawing the line and being able to add the measurement made drawing the shape a lot easier.
 
 
Isometric Block #2


To draw this shape I needed a box 5ftx8ft and then I used the measuring tape and the pencil as well as the push and pull feature.
 
 
Isometric Block #3
 
 
This box was 9ft x 6ft x 4ft


Isometric Block #4
 
This box 7ft x 6ft x 4ft
 
 
Isometric Block #5
 
This box is 7ft x 4ft x 5ft
 
 
Isometric Block #6
 
This box is 8ft x 6ft x 5ft


 Isometric Block #7
 

This box is 8ft x 5ft x 6ft


Isometric Block #8
 
This box is 9ft x 5ft x 6ft


Isometric Block #9

 
This box is 9ft x 6ft x 4ft 
 
 
 Isometric Block #10
 
 This block is 11ft x 6ft x 3ft
 
 
 Isometric Block #11
 
This block is 8ft x 6ft x 5ft


Isometric Block #12
 
This block is 9ft x 6ft x 4ft
 
 
Quiz #3
 
I chose block #3 for the quiz and the measurements are 8ft x 5ft x 5ft. This quiz block is different from the others because I had to create an L shape with triangles and it was a bit harder than the rest.
 
Assignment #23 GingerBread House
 
 
I picked a gingerbread on the internet and tried to duplicate it on Google Sketch. To do the icing I made lines to look like a lattice, and then colored it with Christmas colors.

Assignment #24 GingerBread House 3D

For this assignment I used the gingerbread house in assignment #23 and made it look 3D by duplicating the layer twice and in one of the layers I removed all the colors but red and in the other layer I removed only the color red.
 
Assignment #25 Power Button
 
 
In this assignment I used photoshop and I first created the button and then grouped it duplicated the group and changed the color to red. Then I animated it by adding the green button and the black one pressed the tween button and reverse duplicated it to make 14 frames in total with no delay in between.

Quiz

What is a GIF?


GIF stands for a Graphics Interchange Format. It is a bitmap image format intorduced by CompuServe in 1987.The format of a GIF accepts up to 8 bits per pixel.
 
What is an animation?
 
An animation is a series of frames playing one after the other, the frames can be delayed to a time frame chosen by the animator.  
 
Assignment #26 (Part 1)
 
 
For my first 100 points I first used the rulers to create the wall, the ceiling, and the floor. Then I snapped the corners to add depth to the picture. After I added gradient effects on the walls to bring the room to life.
 
Some problems I encountered in part two was grouping the lights and bringing the layer that has the lights in front of the middle wall layer. I solved it by just mopving the lights layer above the middle wall layer.
 
Assignment #26 Showcase


Assignment #27 Manhattan Center brochure
 
 
For this last assignment I summarized my day as a student at MCSM, from my transportation to the times each period ends as well as the textbooks I use to do my homework, oh and my selfie :D 
 
 
Semester Reflection (September 2013-Jan 2014)
 
This semester I learned about 5 programs. The first program I learned about was Microsoft Publisher and with Publisher I did the business card and the postcard. Second, I used Microsoft Powerpoint to create my portfolio for the first marking period. Then I learned about Adobe Photoshop and the majority of the assignments were with photohop. After Photoshop was Adobe Illustrator and with Illustrator I created the USB and the house phone with it. The last program I learned about was SketchUp and with SketchUp I created the Isometric Blocks along with the Gingerbread house. As I prepare for the next elective course I will take with me the knowledge of the many shortcuts in each program that make creating any project after these shorter and easier. Also, I will take the patience that I learned with me because each of these projects was a hassle and took a lot of patience to create correctly.


Friday, October 18, 2013

2nd Marking Period

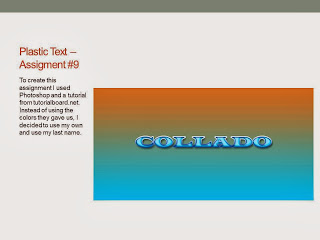
I used the glass effect for my headline, and I added sperate graidient layers as my background

Texture with Layer Modes

First, I found a suit and a pattern then I used the magnetic lasso to select only the jacket itself, then I put the pattern ontop of the new layer and changed the opacity.
 
Stencil Design

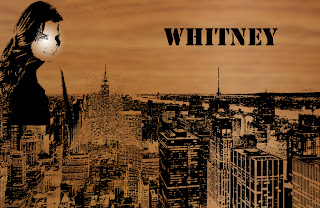
First you find a picture of something and add it to photoshop, and then you change the threshold to show as many details as possible. Then you add a picture of wood and a picture of a girl to photoshop bridge. You choose the move tool to move the wood to the city picture and you invert the colors. Then you change the threshold for the picture of the girl as well to show as many details. You select the move tool and place it with the city picture. You select the brush tool to erase the black spots. The you go to your gradient tool pick the radial gradient tool and pick a transparent one click shift and draw a diagonal like from the girls eye to her jaw to illuminate her face. The use the text option to add your name at the top.
 
Jack O' Lantern


For this project I used the pen tool to create the vectors into shapes to make the face features. Then I used the blending options like inner glow, outer glow, gradient overlay, and stroke on each shape to make it seem like there's light inside of the pumpkin. The I used the round soft brush in a light orange to show the light showing through the shapes. Then, I used a darkher orange closer to teh edge of the pumpkin to help the light orange pop out more.

Flag Displacement

 For this project I used a Dominican Flag and Flag Displacement. I found a picture of a brick wall and a flag, put the brick wall down first then the Dominican flag, then because of the flag displacement it looked more realistic.
 
Face Displacement
 

For this project I used the same directions as for the flag except I used my face instead of the brick wall, and used the magnectic lasso to take my eyes, teeth, lips, and nostrils out.
 
Motion Blurred via Smart Filter


The difference between a Smart filter and a normal filter is that Smart Filters offer adjustments without compromising any pixel data. We can add multiple filters one on top of one another, change the order of the Smart Filters to change the resulting effect. We can remove or hide Smart Filters at any time or we can continuously edit the settings of the Smart Filters to achieve different interesting effects. Also we can paint in a mask to hide or reveal different areas of the filter for refined edits, all without altering the image data.
 
Masking An Area For a Desired Effect


Quick Mask is not a tool as such, but a mode you can enter when working with selections. The Quick Mask lets you create a ready-made mask,which you can edit or turn into a selection by painting with black or white colors. Using this masking technique, you are actually masking the areas you paint, so you must inverse the selection before making any adjustments.


 Soft Filtering Skin Tone
In this easy to follow tutorial we are going to add a soft-focus effect to a portrait that not only minimizes skin imperfections but also adds a romantic glow to the subject’s skin and still keeps the subject’s main features in focus. This technique is a must now for everyone who wants to work in the photo retouching department.

Adobe Illustrator Flash Drive

 For this assignment I used a new program called Adobe Illustrator. In this program I learned how to create a series of rectangles and elipses and how to align them, as well as to send a shape to the back. I also used elements I learned in Photoshop to change the gradient of each shape, and to add text to it as well.

House Phone

For this assignment I used Adobe Illustrator and I also used the ellipse tool, the rectangle tool, gradient, stroke and object>path>offset path. For the buttons I used the line tool, and I used text for the numbers.